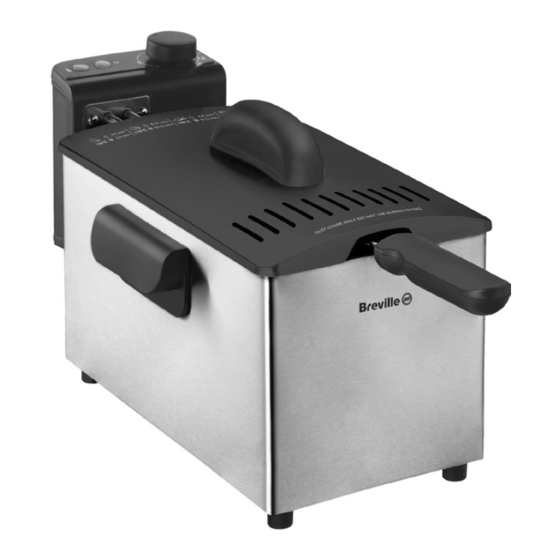


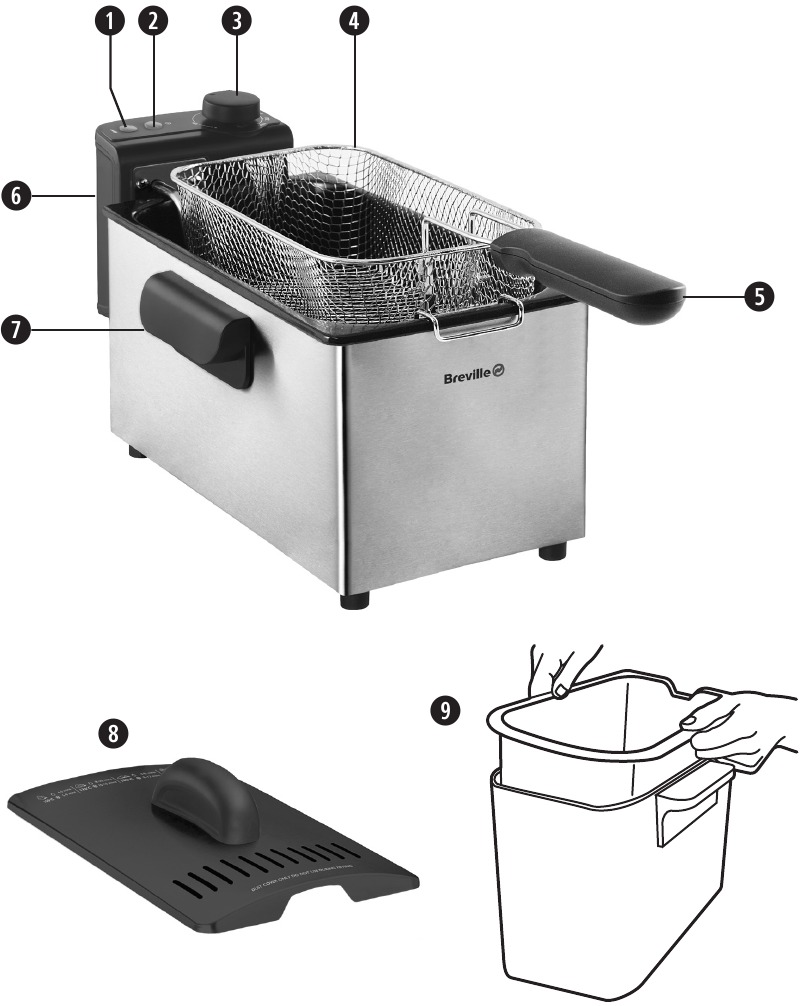
Due to our policy of continuous improvement, the actual product may differ slightly from the one illustrated in these instructions.
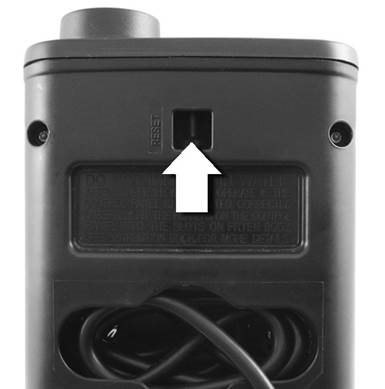
The fryer is fitted with a manually resettable over-temperature thermostat. This is a safety device that will switch off your fryer if it becomes too hot, or if there is too little or no oil present.
If the over-temperature thermostat has operated, switch off and unplug your fryer and allow it to cool down completely. If required, fill with new clean oil above the MIN mark and not exceeding the MAX mark. The reset button can be found after removing the control panel. It is recessed and requires the use of a small screwdriver or similar implement. Press the button to reset the thermostat then plug your fryer back in.
Reset Button
There is a cool zone area below the element that ensures that any stray pieces of food which have dropped to the bottom will not burn and contaminate the oil. After cooking wait until the oil has cooled completely then drain the oil to remove the scraps.
Never immerse any part of the heating element, control panel, power cord or plug in water or any other liquid.
Before using your Breville Fryer unpack the appliance and remove all packaging, promotional materials and stickers. Remove all printed documents. Check that there is no packing around the bowl.
Next wash the lid, frying basket and fryer bowl in hot soapy water. Wipe the element, control unit and body with a damp cloth only — see cleaning instructions.
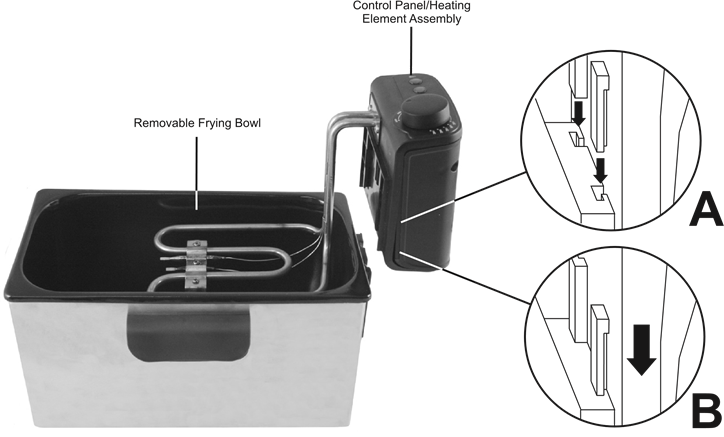
Before assembling or disassembling your appliance, ensure it is unplugged, all parts are cool, the oil has cooled completely and has been removed from the frying bowl.
Always use your fryer on a stable, secure, dry and level surface.
Allow adequate space above and on all sides for air circulation.
Do not allow the appliance to touch any flammable material during use (such as curtains or wall coverings).
Care is required when using the appliance on surfaces that may be damaged by heat. The use of an insulated pad is recommended.
With the basket on the basket rest add the food item(s). Using the handle, lift the basket off the basket rest and gently lower it into the hot oil. Take care from the HOT oil spitting, and from rising steam. When the food is cooked, lift the basket out of the oil and place it onto the basket rest. This will allow excess oil to drain from the food. Next, lift the basket out onto a drip tray and/or kitchen paper.
Note: Battered or coated food may stick to the frying basket. To prevent this, use a slotted spoon to lift the food away from the mesh straight after the basket has been lowered into the oil. Then, allow the food to cook, gently moving the basket from side to side once or twice during cooking.
HOT OIL CAN CAUSE SCALDING! NEVER drop or tip food into the bowl. NEVER put your hand or other body parts into the hot oil. ALWAYS keep hands and face away from rising steam or spitting oil.
Carefully lower or slide the food directly into the frying bowl. Always use utensils to do this e.g. tongs or a slotted spoon.
Use a slotted spoon or a slotted fish slice to remove the food from the oil. Drain on kitchen paper or on a drip tray.
Once you have finished using your fryer turn the temperature control dial fully anticlockwise. Unplug it from the mains supply socket.
Replace the lid and allow the oil and your fryer to completely cool before moving or cleaning your fryer. Always use the carrying handles when moving your fryer. Never attempt to move your fryer using the lid or frying bowl.
We recommend that once the oil has cooled completely, it is best to remove the oil from your fryer and to clean the appliance before storing.
Before removing oil from your fryer ALWAYS switch off, unplug and allow the oil to cool completely.
Always dispose of the oil in an environmentally safe way. Never pour the oil into drains. Contact your recycling centre for advice on the disposal of the oil.
Oils recommended for use in the fryer include:
Oils and fats not recommended:
Oil quantity:
Always use the recommended (MAX) quantity of oil when deep frying. Never exceed this amount, and never use the fryer without any oil in it. Always fill above the MIN mark with oil before using the fryer.
Select your cooking utensils carefully. Do not use utensils which may melt (e.g. plastic). Take care when using metal utensils not to damage the heating element. Metal handles might get hot so use oven gloves, or buy utensils with insulated handles.
Suitable utensils include metal or heat resistant plastic, slotted spoons, slotted fish slices, or tongs.
Not suitable: wooden or plastic non-heat resistant utensils, knives or other sharp implements.
The temperature indicated on your fryer is in degrees Centigrade (ºC). If your recipes state temperatures in degrees Fahrenheit (ºF) use the conversion chart below as a guide.
| ºC | ºF |
| 130 | 265 |
| 150 | 300 |
| 170 | 340 |
| 190 | 375 |
The maximum basket capacity is 1kg but for the best results, we recommend you do not exceed the weights given in the table.
The table below provides cooking guidelines for foods which are commonly deep fried. All the foods have been fried using the oil at the MAX level.
The information given in this table is intended as a guide only. Timings and temperature may vary according to food thickness, size and your own preference.
| Food Type | Weight / Quantity | Temp | Approx. Frying Time (minutes) | Comments |
| Fresh frying chips | 500g | 190ºC | 12 - 15 | Move the basket from side to side once or twice during frying to ensure even cooking. |
| Frozen frying chips | 500g | 190ºC | 10 - 12 | Move the basket from side to side once or twice during frying to ensure even cooking. |
| Frozen scampi in breadcrumbs | 300g | 180ºC | 4 - 6 | The scampi will go a deep golden colour when cooked. Ensure food is piping hot throughout. |
| Frozen plaice coated in batter/breadcrumbs | 2 portions approx. 125g each | 180ºC | 5 - 7 | Fry without the basket and use a fish slice to remove the fish from the oil once cooked. |
| Frozen cod/haddock coated in batter | 2 portions approx. 125g each | 180ºC | 8 - 12 | Fry without the basket and use a fish slice to remove the fish from the oil once cooked. |
| Fresh cod/haddock coated in batter | 2 portions approx. 125g each | 190ºC | 4 - 8 | Fry without the basket and use a fish slice to remove the fish from the oil once cooked. |
| Fresh prawns in batter | 2 portions approx. 90g each | 190ºC | 3 - 5 | Ensure food is piping hot throughout. |
| Frozen cod fish fingers | 10 fingers (300g pack) | 180ºC | 5 - 7 | Move the basket from side to side once or twice during frying to ensure even cooking. |
| Frozen chicken nuggets | 2 portions approx. 100g each | 170ºC | 8 - 10 | Move the basket from side to side once or twice during frying to ensure even cooking. Ensure food is piping hot throughout. |
| Frozen onion rings | 2 portions approx. 100g each | 190ºC | 5 - 9 | Move the basket from side to side once or twice during frying to ensure even cooking. |
| Vegetable fritters in batter | 2 portions approx. 100g each | 150ºC | 2 - 5 | Move the basket from side to side once or twice during frying to ensure even cooking. |
| Banana/fruit fritters | 2 portions approx. 100g each | 150ºC | 2 - 5 | Move the basket from side to side once or twice during frying to ensure even cooking. |
When frying shop bought food items, follow the manufacturer's instructions.
When frying meats, ensure that they are piping hot throughout before serving.
To check food has heated through, use this quick test:
Take a knife or metal skewer and push it into the centre of the food. Hold it there for a few seconds then remove it. If the skewer or knife is hot to the touch, the food is hot in the middle.
Alternatively use a food thermometer. Chicken is cooked when the juices run clear and the meat is no longer pink in the centre.
Always unplug your fryer and allow the oil and appliance to cool completely before cleaning it.
NEVER immerse the control unit, cord set or plug in water or any other liquid.
Never use harsh abrasive cleaners or cleaning materials.
No parts of this appliance are dishwasher safe. Always hand wash.
Cleaning the removable frying bowl, frying basket and lid:
Cleaning the control unit, element and body:
This appliance must be earthed.
Plug should be BS1363 approved Fit a 13 Amp Fuse
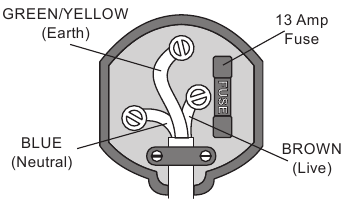
Ensure that the outer sheath of the cable is firmly held by the clamp
This appliance is fitted with either a moulded or rewirable BS1363, 13 amp plug. The fuse should be rated at 13 amps and be ASTA approved to BS1362.
If the fuse in a moulded plug needs to be changed, the fuse cover must be refitted. The appliance must not be used without the fuse cover fitted.
If the plug is unsuitable, it should be dismantled and removed from the supply cord and an appropriate plug fitted as detailed below. If you remove the plug it must not be connected to a 13 amp socket and the plug must be disposed of immediately.
The wires of the mains lead are coloured in accordance with the following code:
GREEN/YELLOW = EARTH
BLUE = NEUTRAL
BROWN = LIVE

The wire which is coloured GREEN/YELLOW must be connected to the terminal in your plug which is marked with an E or by the earth symbol () or coloured GREEN or GREEN /YELLOW.
The wire which is coloured BLUE must be connected to the terminal in your plug which is marked with the letter N or coloured BLACK.
The wire which is coloured BROWN must be connected to the terminal in your plug which is marked with the letter L or coloured RED.
If any other plug is used, a 13 amp fuse must be fitted either in the plug or adaptor or at the distributor board.

Here you can download full pdf version of manual, it may contain additional safety instructions, warranty information, FCC rules, etc.